Secrets To Discharge Capacitor That All Electronic Repairers Should Know
Capacitor discharge is the first thing you should do as an electronic repairer before touching the power supply section. The large filter capacitor in the power supply section can hold dangerous high voltage even if the unit has been off for few days. It is advisable to discharge the filter capacitor first before you start to troubleshoot in order protect yourself from electrocuted. Though the capacitor current stored in the capacitor can’t kill you but it is enough to burn your hand, fingers and your skin when you accidentally touch it and the worst case is while you’re carrying the Monitor or TV, you might just throw off the equipment when you got a shocked from the filter capacitor and the cathode ray tube monitor may break and cause the flying glasses to hit your body or eyes.
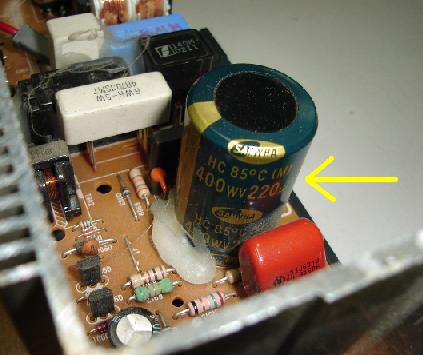
Just be cautious when handling the power supply area. You can always use a meter to confirm whether there is still charge in the capacitor. Place your meter’s black probe to the capacitor negative pin (you can see the negative marking at the sleeve of the capacitor) and the red probe to other pin. If there is high voltage registered in your meter then you have to discharge the capacitor otherwise you may proceed to repair the equipment. Typical value for this type of filter capacitor is 220 to 330 microfarad with a 400 to 450 voltage rating.
The large filter capacitor in power supply section
Just place the screw driver tip to touch the two pin of the capacitor, within seconds the charge will be gone. If
the capacitor holds a heavier charge of electricity then discharging the capacitor with a screw driver may melt the tip of the screw driver
and the copper on the printed circuit board. Sometimes a big spark may cause small disintegrated solder lead or copper to fly out from the
circuit board and might injured your eyes or body.
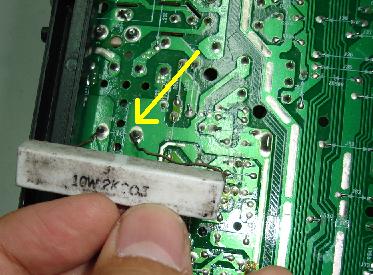
Use a resistor to discharge the capacitor leads
Using only one hand, you can do the job while the other hand you still can hold a solder gun or secure the equipment casing.
|
|
Copyright@ 2006-2014-www.ElectronicRepairGuide.com All Rights Reserved

