|
Troubleshooting The Microcontroller Circuit In Electronic Equipment
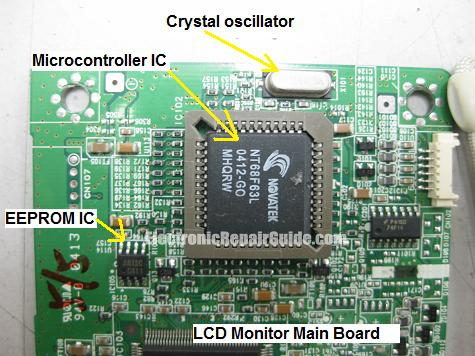
Why am I mentioning the word Microcontroller instead of Microprocessor? Because the IC’s that were found in most of the electronic equipment are Microcontroller and not Microprocessor (CPU). However many electronic repairers just called the IC as CPU which I found it to be misleading. Here I’m going to explain to you what is the different between these two IC’s.
What is the different between a Microprocessor and a Microcontroller?
A Microcontroller is a specialized form of Microprocessor that is created to be
self-sufficient and cost-effective, where a Microprocessor is typically designed to be general purpose use like in a Personal Computer
(PC). The Microcontroller is the integration of a number of useful functions into a single IC package. These functions are:
A Microcontroller generally has the main CPU core, ROM/EPROM/EEPROM/FLASH, RAM and some accessory functions (like timers and I/O controllers) all integrated into one chip.
Microprocessor IC is generally just the CPU core itself, although nowadays it might have some accessory parts also integrated to the same chip (for example cache memory).
Microcontrollers IC’s are frequently found in consumer electronics like Monitors, Televisions, in automobiles, washing machine, office machines, toys, appliances and etc.
You may click here for more information about microcontrollers:
http://rab.ict.pwr.wroc.pl/dydaktyka/supwa/mcu/docs/pdf2/misc/sg186r3.pdf
I still could recall during the early 90’s and before, many of the Analog Monitors that I repaired does not have the microcontroller circuit. The functions of the Monitors were all controlled by variable resistors. Let say if the Monitor brightness have problem we just have to follow the brightness control starting from the variable resistor in the front panel and trace it backward and it was very easy to locate the fault. You can use this method to trace on other circuit as well like the Pincushion circuit, Horizontal size circuit, Vertical Size circuit and etc.
However when the newer type of Monitors (Digital Monitors) that use the Microcontroller circuit came into the market I have problem in finding those fault and you can’t follow the way that you used in finding fault in an Analog Monitors. Below I cover some of the most frequently asked questions from fellow members:
Question 1: Assuming a Microprocessor need 5 volt to run and if the supply voltage is not sufficient like 4.2 volt or 3 volt and etc, does it affect the overall performance of the Microprocessor?
Answer: Yes definitely, it will either do not work at all (have input signal but no output signal) or working intermittently. That is why whenever I have email that asked me about weird problems in the electronic equipment that they are repairing I always asked them to check on the supply voltage. Make sure that the supply voltage is within the spec. Intermittently means the equipment sometimes could work and sometimes don’t and even if the equipment is working then out of sudden the equipment could shutdown and restart again and if you repair Monitors, the OSD (On screen Display) could appear on it own and creating lots of weird problem to the display and etc.
Question 2: How do I know which one is the voltage supply pin if I do not have the schematic diagram?
Answer: The only choice you have is to trace backward from each pins of the microprocessor till you found a voltage regulator IC with the part number of 7805 or any other new part number that you need to check it out from internet search. The Microcontroller pin should lead you to one of the leg of the voltage regulator IC. Some do not use voltage regulator but uses transistors circuit where the source of voltage was taken from the output of switch mode power supply.
Question 3: Will the Crystal at the Microcontroller circuit cause problem?
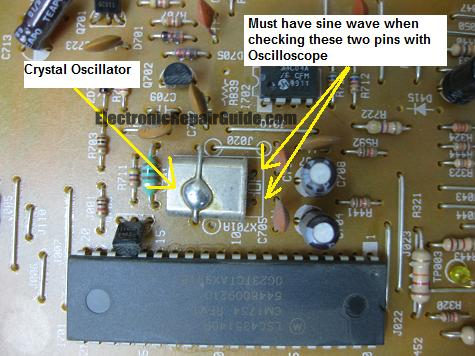
Answer: Certainly- Not only it will not work (causing the equipment to stop working) but also could cause intermittent problem too just like any other electronic components. If using scope to test on the CRYSTAL pins and you did not get the sine wave chances is very high the CRYSTAL it self have problem or it could be the Microcontroller IC or corresponding components fault. An intermittent Crystal in Monitor (LCD or CRT) could cause the OSD (On Screen Display) to suddenly appear after using for sometimes and the OSD could suddenly goes off too on its own without pressing any of the front panel control button
The best test to isolate Crystal problem is to use a freezer (coolant spray) together with a hair dryer.
Question 4: Could EEPROM IC cause problem in electronic equipment?
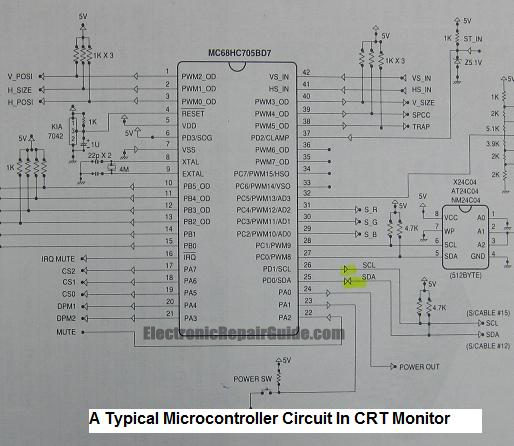
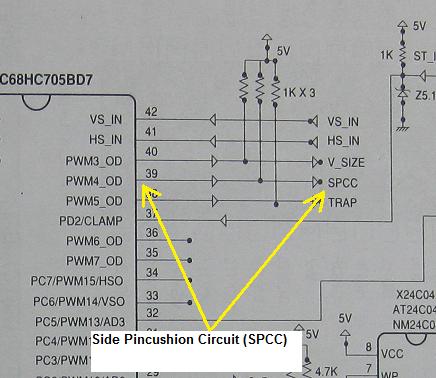
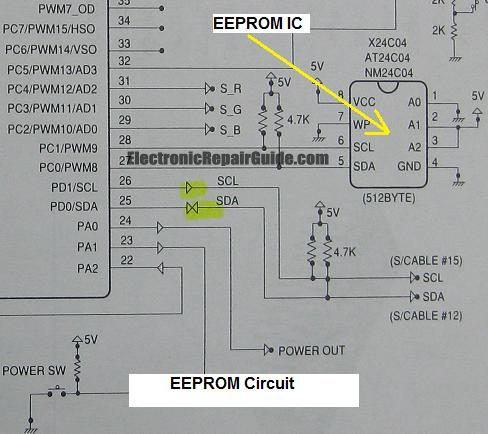
Answer: Yes, when the internal data had corrupted. For your information EEPROM IC rarely shorted. With a missing or corrupted data inside the EEPROM IC, Microcontroller could not execute programs/functions properly. For example, all of the control functions works properly except the Side pincushion circuit (SPCC) function. You have thoroughly checked the SPCC but could not locate any bad components. If you look at the photo below you could see that the side pincushion signal is coming from pin 39 of the Microcontroller. So what makes this signal missing? In fact there is nothing wrong with the Microcontroller IC, it was due to a corrupted data in the EEPROM IC that had caused the Microcontroller to stop producing the signal to the SPCC circuit.
If you come across lets says 4 out of the 7 control functions in a Monitor (assuming all the control functions are from the Microcontroller IC) not working at the same time, chances is very high the EEPROM and corresponding circuit are at fault. It is very rare to find 4 controls function to be defective at the same time. Of course there are also chances the Microcontroller IC itself having problem but for your information, generally Microcontroller IC is much more lasting and reliable than EEPROM IC. However there is some isolated case especially in few models of Samsung LCD Monitor where the data inside the Microcontroller corrupted causing many weird problems from no display, display shutdown to OSD problem. Surprisingly the data inside the EEPROM was still good.
If you need to solve the data corrupted problem, one has to reprogram the IC and the requirement is that you must have the original data and a programmer. Without original data the blank IC’s would not work in the equipment.
Question 5: How do we know if the Microcontroller IC is functioning or not? This question has similarity as “How do we test a Microcontroller IC”?
Answer:
First- The Microcontroller IC must receive a steady supply voltage. A missing or low supply voltage will cause the Microcontroller not to work.
Second- The Microcontroller IC must be reset first the moment you turn “On” the equipment. In other words, the reset is performed at power up. The reset voltage is usually 5 volt (some designs have lower reset voltage). The reset pin on a Microcontroller initiates an instruction to return to the beginning of a program. Please see the reset circuit in the diagram below.
Third- You must get a sine wave (waveform) measured with oscilloscope on the two pins of the Crystal oscillator. A steady waveform indicates either the Crystal oscillator or the corresponding components have problem or the Microcontroller IC itself faulty.
Fourth- Since most of the Power LED signal of equipment nowadays is coming from Microcontroller IC, the status of the LED color will tell you if the Microcontroller IC is good or bad.
A red LED indicates either the Microcontroller IC itself have problem or the Microcontroller IC did not get an appropriate signal for example a missing either horizontal or vertical signal or missing both signals to the Microcontroller IC could cause the LED to turn RED color.
Note: A shorted corresponding components like diode, capacitor and etc could also cause the LED to turn red. Thus you have to make sure each of the IC pins does not short to ground. The best reference to check this is to have a schematic diagram.
A green LED indicates that the Microcontroller IC is working (got supply voltage, reset circuit ok, Crystal oscillator good, there are incoming input signals and etc). However although now the LED is green with all the good voltage, signals and etc, this does not mean that the Microcontroller IC is producing all the necessary signals because it depends on the data received from the EEPROM IC. A corrupted data could cause the LED to turn red and also causing missing one or more signals as explained in Questions 4. Unless you could confirm that the EEPROM IC is good then only you suspect a bad Microcontroller IC.
Question 6: How do we know which Microcontroller IC pins control which circuit especially when we do not have the schematic diagram?
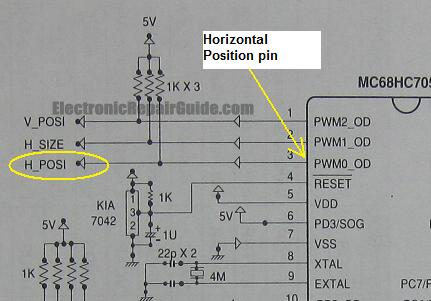
Answer: Okay, assuming you come across a Monitor fault that the Horizontal position control is not functioning. Since we do not know which pin of the Microcontroller IC is controlling this signal what we do here is to test out all pins with an analog meter that sets to DC 10 Volt range and place the red probe to the first pin of the Microcontroller and the black probe to cold ground. Now by turning “On” the Monitor and from the OSD select the horizontal position control adjusting it from + to – and from – back to +. This will cause the horizontal position pins to change its output voltage say from 2 to 5 volt and from 5 volts back to 2 volts.
If the first pin where you have put your red probe does not change according to the setting of the horizontal position control, then place on pin 2 and adjust the OSD setting again until you found the pin that the voltage will change according to the adjustment. That pin is the horizontal position pin and you now can put your whole concentration to start troubleshooting from this pin onward.
Conclusion- Reread this article again and applies it onto any of the electronic equipment you are repairing. Do your own test and make sure write down all the test result in a book for future reference. Well, that’s all for it for this month repair newsletter and hope you will stay tune for next month May repair newsletter. All the best to you and have a great and a fabulous day!
Click here to learn how you can become a Professional in Testing Electronic Components
Click here to learn how you can become a Professional in LCD Monitor Repair
Recommendation:
Recommended Mr Kent LCD TV Repair Membership website-Visit Now!
Recommended Mr Kent Plasma TV Repair Membership website-Visit Now!
|
|
Copyright@ 2006-2014-www.ElectronicRepairGuide.com All Rights Reserved
